SENTINEL
Sign in

Setup guide

A Raspberry Pi, a memory card, five steps.

Sentinel runs on a Raspberry Pi you can buy anywhere. Pick the board, pick a card, flash the image, boot it once at home — then it lives in your car and you stop thinking about it. Everything you need is on this page, in order.

Step 01 · 05

Choose your Raspberry Pi

Two boards run Sentinel. Both plug into the car’s dashcam USB port and behave exactly like the drive they replace — the car records straight onto them.

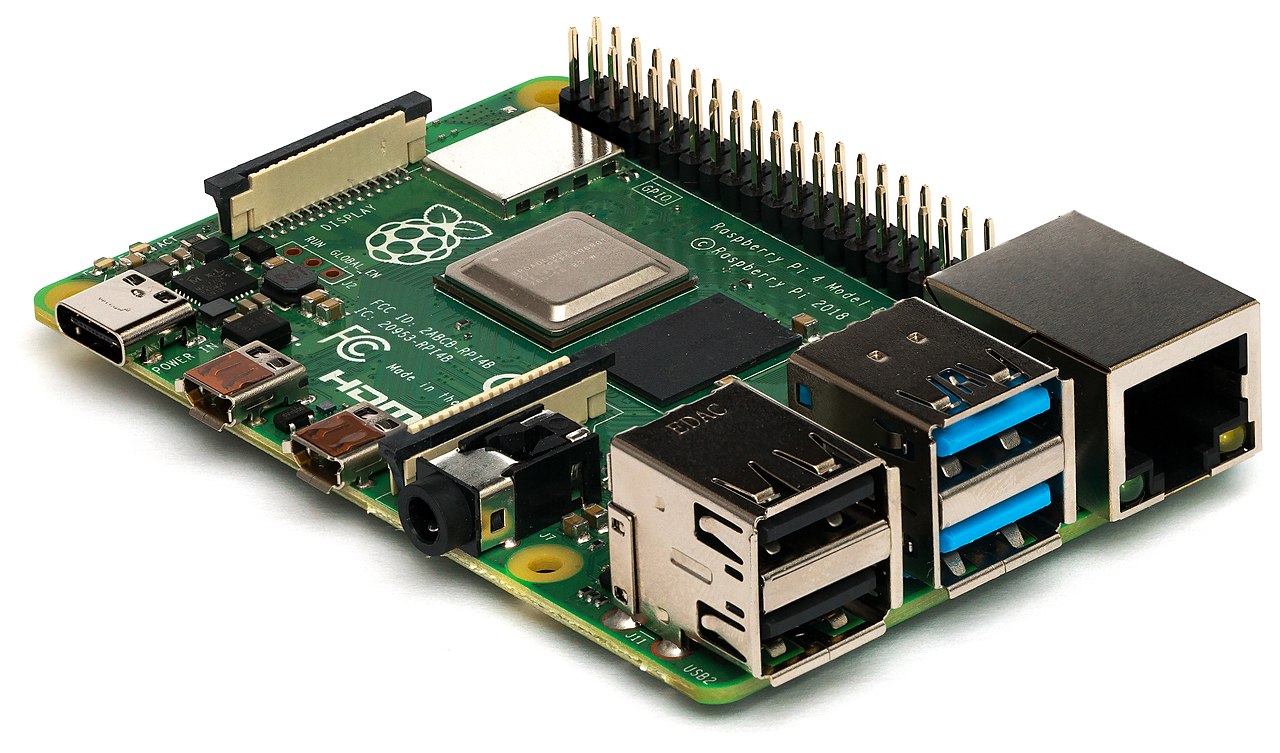
Raspberry Pi 4 Model B single-board computer, showing its USB and Ethernet portsPi 4 photo: Wikimedia Commons, CC BY-SA

Raspberry Pi 4

Recommended

The proven choice. Plenty of memory, plenty of headroom, and its USB-C port carries both power and data to the car in one cable.

Connects viaUSB-C (the power port doubles as the car link)
CableUSB-A → USB-C, data-capable
Memory1–8 GB — any variant works, even the 1 GB
Cable note: use a USB-A to USB-C cable that carries data— many bundled charging cables don’t. If the car never sees the drive, the cable is the first suspect.
Raspberry Pi Zero 2 W, a credit-card-slim board with two micro-USB ports along its edge

Raspberry Pi Zero 2 W

Smallest + cheapest

Tiny enough to disappear into the glovebox, and costs about as much as lunch. Just as capable of being your car’s dashcam drive.

Connects viaMicro-USB — the data port, labelled USB
CableMicro-USB → USB-A, data-capable
Memory512 MB — enough for Sentinel
Two identical-looking ports: plug the car into the inner one marked USB — the outer PWR port is power-only and the car will see nothing. Data-capable cable here too.
Raspberry Pi 5 — not supported

The Pi 5’s redesigned USB hardware (the RP1 chip) cannot act as a USB drive, so the car has nothing to record to. It’s a known platform limitation, still open — see bookworm-feedback #77 and raspberrypi/linux #6289. Buy a Pi 4 or a Zero 2 W instead.

Step 02 · 05

Pick a microSD card

Any card works — but endurance cards are built for exactly this: recording, all day, every day. They’re rated in years of continuous video where ordinary cards are rated in months. Three picks we trust:

A 256 GB SanDisk High Endurance microSD card against a dark background

SanDisk MAX Endurance

120,000 hrsrated recording · 256 GB · 1080p

The flagship — over a decade of continuous recording on paper. Set and forget.

32–256 GB · V30

SanDisk High Endurance

20,000 hrsrated recording · 256 GB · 1080p

The budget-friendly pick — still vastly outlasts regular cards, and goes up to 512 GB.

32–512 GB · V30

Samsung PRO Endurance

140,160 hrsrated recording · 256 GB · 1080p

Samsung’s surveillance-grade line — the highest endurance rating of the three.

32–256 GB · V30

How big? 256 GB minimum — 512 GB or 1 TB if you can.

Sentinel splits the card into a camera buffer the car records into and a music partition for your tunes. Bigger card, bigger buffer — more hours of away-from-home driving survive on very long trips, until the car is back on your Wi-Fi and the footage comes home.

Card sizeCamera bufferMusic
256 GB64 GiB8 GiBMinimum
512 GB96 GiB16 GiBRecommended
1 TB128 GiB32 GiBRecommended · long trips

Going 1 TB? Endurance lines top out around 256–512 GB today — at that size, pick a quality standard card from a major brand.
Step 03 · 05

Flash the image

Write the Sentinel image onto your card. Four tools, one result — use whichever you already know. If in doubt, pick Raspberry Pi Imager: it writes and verifies in one pass.

  1. Download Raspberry Pi Imager for Mac or Windows from raspberrypi.com/software and install it.
  2. Pop the microSD card into your computer (a USB card reader works fine).
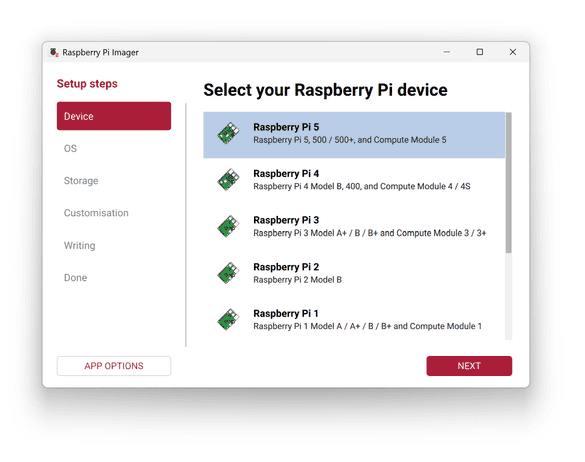
  3. Choose Device — pick your Pi model (Raspberry Pi 4 or Zero 2 W).
  4. Choose OS — scroll to the very bottom and pick Use custom, then select the Sentinel image you downloaded. A compressed .img.xz is fine — Imager unpacks it for you.
  5. Choose Storage — select your microSD card. Double-check the size matches your card; everything on it will be erased.
  6. Hit Write, confirm, and let it write and verify. Eject when it says it’s done — that’s it.
Raspberry Pi Imager window on the device-selection step, listing Raspberry Pi models to choose from
Raspberry Pi Imager — Choose Device, then Use custom
Step 04 · 05

First boot — at home, not in the car

Do this on your desk before the device ever sees the car. It takes about five minutes: join its setup network, enter your home Wi-Fi, and let it update itself.

  1. Slot the card into the Pi and plug it into any USB power brick — a phone charger is perfect.
  2. On your phone, open Wi-Fi settings and join the network the device broadcasts:
    NetworkSentinel-Setup
    Passwordamber-falcon
  3. The setup screen pops up on its own. Write down the pairing code it shows you— you’ll need it in a minute.
    No pop-up? Open your phone’s browser and visit any website — the setup screen will step in.
  4. Enter your home Wi-Fi name and password on that screen.
  5. The device connects to your Wi-Fi and appears Online in your Garage within a couple of minutes.
  6. Claim it: sign in to the portal, choose Add a device, and enter the pairing code you wrote down. It lands in your Garage within a minute.
Step 05 · 05

Into the car

Setup is done — the device already knows your home Wi-Fi. All that’s left is plugging it in.

  1. Unplug the Pi from the power brick.
  2. Plug it into the Tesla’s dashcam USB port.
    Model 3 & Y (2020 on), newer S & X: the USB port inside the glovebox is made for this — hidden and out of the way. Earlier cars: use a front USB-A port in the center console (the front ports carry data; rear ones are charge-only).
  3. That’s it. The car sees its dashcam drive and starts recording — your car’s footage starts arriving home on the next drive.

After setup

Three small things in the portal, then forget about it

Give footage a home

In Storage, add your NAS, Dropbox or S3. The first destination becomes Priority 1; clips start flowing on the next parked Wi-Fi session.

Teach it a backup way home

Add a second network (a phone hotspot works well) under Wi-Fi. The device joins the highest-priority network it can find whenever the car parks.

Forget about it

That’s the point. The garage shows a green heartbeat and today’s offload count. If anything ever needs you, it turns red — and only then.

Card flashed, code in hand? Your Garage is waiting.